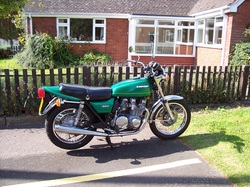
Standard Pipes
The standard exhausts were still fitted when we got this bike. After 32 years that's a good sign that it has been well cared for.
Unfortunately the rear silencers - which include the mid section and inner header pipe - were corroded and the baffles were not worth saving.
We ruled out a 4:1 system, the bike is designed for pipes at each side and looks unbalanced without them. The other obvious choice is a new standard system (only £75 back in 1977) - unfortunately they have long since sold out and production ceased. IF YOU HAVE ANY NEW Z650 SILENCER COMPONENTS PLEASE CONTACT US.
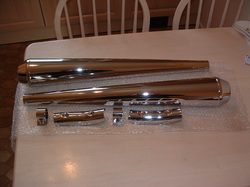
Replacement Silencers
Word from the experts was that you could shorten the standard pipes and graft on a replacement silencer. We searched everywhere and came up with this nice pair.
They come with two reducing colllars and a chrome exhaust clamp. There is also a basic rear hanger and fittings included.
We tried them against the originals and were very pleased with the likeness. They do have more than one gas exit hole but so did Dunstall pipes in the 1970's
The fittings below are originals and do not come with them.
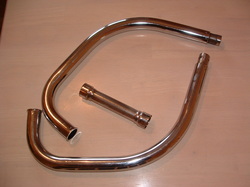
Strip Polish & Re-Chrome Needed
We then examined the rest of the system and decided to get the down pipes stripped, polished and re-chromed. They fit into a hole on the outside of the long silencer section and they are marked with a 1 or 4 at the top depending on which cylinder they serve.
The original centre link pipe takes a lot of road grit thrown from the front tyre and the finish had suffered. This would need the same treatment.
There are heat proof exhaust joint gaskets at both ends of the mid pipe and where each down pipe joins the main silencer.
The original centre link pipe takes a lot of road grit thrown from the front tyre and the finish had suffered. This would need the same treatment.
There are heat proof exhaust joint gaskets at both ends of the mid pipe and where each down pipe joins the main silencer.
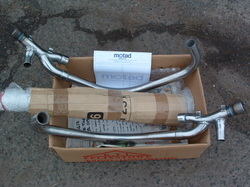
New Shortened Header Pipes
There are various ways to join the new silencer onto the old system. We wanted to use an internal joint which would be hidden by the chrome side trims from the standard pipes.
First the silencers were removed, then the good parts had the chrome stripped away. Our friends at MOTAD in Walsall came to the rescue and added a new flared end which was a push fit into the new silencers. The new headers then joined the other parts (above) for chrome plating by our friend Graham at ACF Howells in Walsall.
First the silencers were removed, then the good parts had the chrome stripped away. Our friends at MOTAD in Walsall came to the rescue and added a new flared end which was a push fit into the new silencers. The new headers then joined the other parts (above) for chrome plating by our friend Graham at ACF Howells in Walsall.
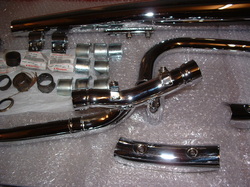
Headers & Gaskets etc.
Here's what came back from plating, alongside the exhaust joint gaskets, split keepers and the original side shields - which would hide any signs of the joint.
Note the two fixing points for the heat shields on the side of the mid- section. The special chrome pan head screws that hold these on have to be very short to prevent damage to the pipes.
Note the two fixing points for the heat shields on the side of the mid- section. The special chrome pan head screws that hold these on have to be very short to prevent damage to the pipes.
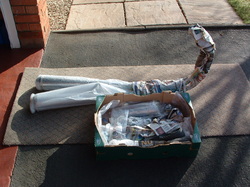
Mystery Package!!
So here we have the new silencers, which have been joined to the standard inner header pipes.
The box contains all the heat shields, clamps, gaskets, and split keepers which have been kept safe whilst the bike has been rebuilt.
It's a great feeling to reach this stage in the restoration with March just a week or so away. Perhaps it's time to cancel that SORN now.
The box contains all the heat shields, clamps, gaskets, and split keepers which have been kept safe whilst the bike has been rebuilt.
It's a great feeling to reach this stage in the restoration with March just a week or so away. Perhaps it's time to cancel that SORN now.
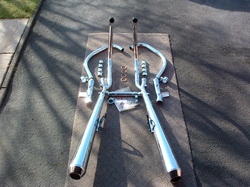
New Exhausts Rear View
So here it is then - the Holy Grail of Z650 restoration - a complete new standard exhaust system.
Well as near as Zedrider could get it anyhow!
The mid section is actually a new old stock item. It came with the new gasket fitted at each end which is a good bonus as they are expensive on their own. RESULT!
Perhaps one day someone will start to make new reproduction exhausts for Z650 and Z1000 - the same as the do for H2, Z1 and CBX etc.
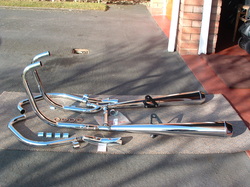
New Exhausts Side View
We were also pleased to get two new old stock heat shields to go onto the side of the pipes and cover the new joint we made. You can see from these shots that it is easy enough to attach the standard Z650 rear exhaust brackets to our new silencers. They have an elongated hole to take a captive bolt - so they can probably do Z1000 etc. as well. Ask if you need measurements.
The black brackets were re-finished and we used new stainless captive bolts & nuts as they are hard to get at once fitted to the bike.
The black brackets were re-finished and we used new stainless captive bolts & nuts as they are hard to get at once fitted to the bike.
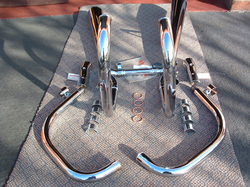
New Exhausts Front Close Up
You can see the two outer header pipes detached in this shot.
TIP - We fitted the 1 and 4 outer header pipes seperately to the bike - after the main assembly and inner headers had been installed. It makes the operation easier with less chance of damage to frame tubes etc.
But you can only do this if you can free up the outer header joint. This is formed by a chrome clamp and the inner gasket - but after 30 plus years rust may have taken up the role of superglue so be careful!!
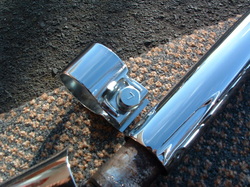
New Chrome Header Clamp
We were lucky enough to find a brand new pair of Kawasaki chrome header clamps.
Here's one of them - just escaped from the bag after 30 years - complete with perfect number 7 headed bolt.
Bootiful!
Note the inner section of the header pipe sticking out to form the gasket joint - all factory pipes were double skinned - this helps to stop the headers going blue - unlike modern after market pipes.
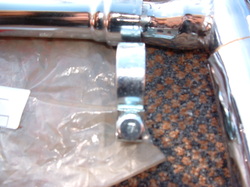
Link Pipe Clamp - Zinc Plated
Our original link pipe clamps and bolts were solid. So they got de-rusted, polished up and re-zinc plated.
Not to be outdone by the posh chrome outer clamps - they have got original 1978 number 7 bolts restored to perfect factory fresh condition.
Not to be outdone by the posh chrome outer clamps - they have got original 1978 number 7 bolts restored to perfect factory fresh condition.
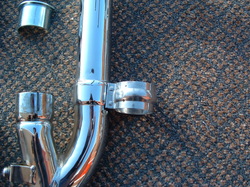
Stainless Crimped Joint Cover
The Zedrider luck ran out here - and our bike has lost one of these joint covers at some stage.
It will still be found in good condition on old broken exhausts because it is made from stainless steel.
It fits over the weld and is crimped shut where the two dimples can be seen.
Lucky for us our welded joint was stripped, polished and re-chromed as part of the new headers so it doesn't look too bad without the cover for now. But we are looking for one!!
IF ANYONE CAN PUT US ONTO ANOTHER ONE TO MATCH THIS SIDE PLEASE CONTACT US.
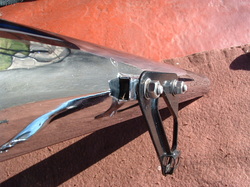
Rear Exhaust Hanger Bracket
Here's a shot to show you how well the standard bracket fits onto the new silencers.
A special thin captive self locking nut goes in the bottom section of this bracket - that will line up with the rear footrest bolt to support the back end of the system. On one side the bracket is longer with a rubber for the main stand to park on.
TIP - Ensure that the bracket is bent inwards at the back nearest the tail light to hold the captive nut into place. If you don't do this your bracket will catch the swinging arm as the gap between them is small.
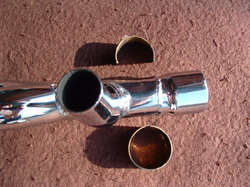
Brass Locking Collets
We would not recommend welding the new rear silencer onto the re-chromed front section - unless you are a total expert. We have tried a couple of ways that involve non-permanent fixing - a bit like a modern slip on end can.
This is our favourite way. Use tin snips to cut a section of brass sheet into a rectangle that will wrap once round the pipe and fit between heat shield bracket and the new flared end piece.
Then cut another section half as long.
This is our favourite way. Use tin snips to cut a section of brass sheet into a rectangle that will wrap once round the pipe and fit between heat shield bracket and the new flared end piece.
Then cut another section half as long.
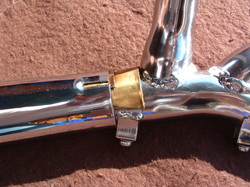
Smaller Collet Before Tapping In
Fit the silencer over the flared end of the pipes and over the start of the long brass collet - which you have wrapped tightly around the pipe.
Have the half collet sticking just under the full collet on the inside of the pipe (more room as no shield bracket).
Once the full collet is twisted home level with the end of the new silencer gently tap the half collet home from the inside of the pipe using a flat edge and hammer.
This action will tighten the full collet and provide a strong joint.
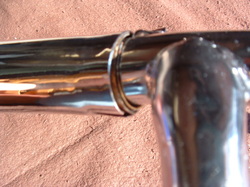
Both Collets In Place
Here you can see the finished effect. It gives a surprisingly strong joint but does allow the new silencer to twist on the mid section - useful to allow exact lining up with rear hanger brackets and the footrest bolt.
You could add some exhaust paste if you wanted to but with the amount of pipe inside the new silencer - and the direction of gas flow - it's really not a problem and has gone through MOTs without a hitch.
TIP - we coat the exhaust gaskets and joints with grease to stop them seizing up. This also traps carbon deposits and the exhausts can then "heal up" tiny gaps themselves as you ride.
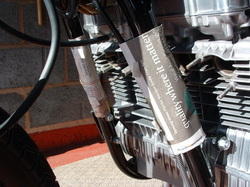
Frame Protection In Place
Check your exhaust studs are clean and lightly oiled. Make sure threads are good as they are only 6mm and have to pull the headers into the copper gaskets quite hard to squash them into a gas tight seal.
Do not re-fit the front fender yet as the header pipes may damage that new chrome!
If it is in place we would cover the rear half with bubble wrap held in place with rubber bands until after the pipes are fitted.
Do not re-fit the front fender yet as the header pipes may damage that new chrome!
If it is in place we would cover the rear half with bubble wrap held in place with rubber bands until after the pipes are fitted.
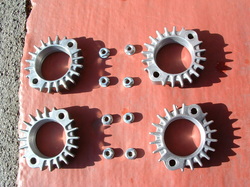
Exhaust Clamps & Special Nuts
We cleaned up our alloy exhaust clamps by quickly dipping them in Proscale 650 rust dissolver and then brushing them to a low shine with a brass tooth brush.
If you use these correct Kawasaki exhaust manifold clamp nuts they come with a seperate plain washer attached to the base of the nut. Much easier to handle in a tight place.
You can now fit your copper exhaust gaskets to the cylinder head. We used the old trick of 4 little blobs of grease to hold them in place before the pipes are ready.
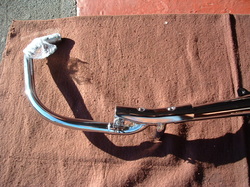
Pipes Ready to Fit
It doesn't really matter which side you fit first. But when you fit pipes 1 & 2 you must pre- fit the side heat shield.
This is because the side stand bracket will block access to one of the heat shield fasteners once the pipes are mounted. We've forgotten that a couple of times and it is really frustrating!!
TIP - Get some cling film around the top of the header before fitting. This will prevent the new chrome getting scratched by the split keepers and manifold clamp - and give you somewhere to park the clamp whilst you get the keepers into place.
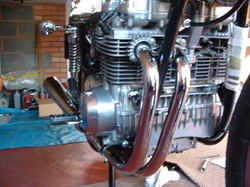
Pipes 3 & 4 Fitted
We pre-fit the clamp and hang the header into it (clingfilm protects) and then pull up the rear hanger bracket to engage the captive nut with the rear footrest bolt.
Once that is engaged we push it forward and tighten it - otherwise the header clamps will push it backwards - fouling the swinging arm.
Then we pull the clamp and clingfilm back to insert a pair of split keepers before tightening evenly and wriggling to get the keepers into the correct place on the copper gasket.
Once you are happy with pipe 3 the outer pipe 4 goes in as a follow up using the same ideas.
Link Pipe & Clamps Fitted
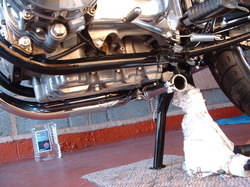
Now one side is complete fit the link pipe. We coated the entire inner link pipe with waxoyl using a toothbrush - it sits at the low point of the system and gathers trapped liquids and condensation. You must re-fit the two link pipe clamps at this stage. The parts diagram shows them fitted with the clamp at the rear but we found that interferes with the main stand spring etc. so we fitted ours like this.
TIP - Apply a good smear of grease to the gaskets that are inside the ends of the link pipe - and also to the incoming silencer pipes. You never know when they might have to come apart again.
TIP - Apply a good smear of grease to the gaskets that are inside the ends of the link pipe - and also to the incoming silencer pipes. You never know when they might have to come apart again.
Original System Restored
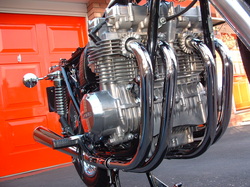
Once the second side is attached you can remove the protective frame wrapping and tighten up all the clamps. Don't forget the rear footrest bolts which hold the rear silencer hanger bracket. Your main stand will now park on the rubber so lose the wrapping!
TIP - The rear footrest bracket bolt needs a lock washer - otherwise it will project too far and catch the swinging arm.
Get the chrome cleaner or wax out and get all those greasy finger marks off that fantastic new exhaust system. Then you get a well deserved cup of tea!
TIP - The rear footrest bracket bolt needs a lock washer - otherwise it will project too far and catch the swinging arm.
Get the chrome cleaner or wax out and get all those greasy finger marks off that fantastic new exhaust system. Then you get a well deserved cup of tea!
New Silencers or Old?
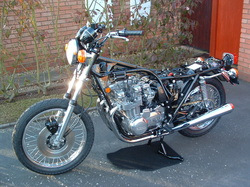
Here's the finished effect. We hope you agree that the replacement silencers look really close to the originals at the top of this page.
If you would like to order a new boxed set of replacement silencers for your ride please contact us for measurements, postage costs etc.
DON'T FORGET ZEDRIDER IS ALWAYS LOOKING FOR NEW Z650 EXHAUST SYSTEM PARTS. Let us know via the Useful Contacts page
If you would like to order a new boxed set of replacement silencers for your ride please contact us for measurements, postage costs etc.
DON'T FORGET ZEDRIDER IS ALWAYS LOOKING FOR NEW Z650 EXHAUST SYSTEM PARTS. Let us know via the Useful Contacts page

